- docs
- FlowFuse User Manuals
- Using FlowFuse
- Getting Started
- FlowFuse Concepts
- Changing the Stack
- Device Groups
- DevOps Pipelines
- Environment Variables
- FlowFuse File Nodes
- FlowFuse Persistent Context
- FlowFuse Project Nodes
- High Availability mode
- Instance Settings
- Logging
- Shared Team Library
- Snapshots
- Teams
- User Settings
- FlowFuse API
- Migrating a Node-RED project to FlowFuse
- Device Agent
- Device Agent
- FlowFuse Device Agent Introduction
- Quick Start
- Installation
- Quick Start with Web UI
- Register your Device
- Running the Agent
- Deploying your Flows
- Hardware Guides
- FlowFuse Cloud
- FlowFuse Cloud
- FlowFuse Self-Hosted
- Installing FlowFuse
- Overview
- Configuring FlowFuse
- DNS Setup
- Docker install
- Email configuration
- First Run Setup
- FlowFuse File Storage
- Install FlowFuse on Kubernetes
- Local Install
- Upgrading FlowFuse
- Administering FlowFuse
- Administering FlowFuse
- Administrator configuration for SSO
- licensing
- Monitoring
- Telemetry
- User Management
- Support
- Community Support
- Premium Support
- Debugging Node-RED issues
- Contributing
- Contributing to FlowFuse
# Kubernetes Install
This version of the FlowFuse platform is intended for running in the Kubernetes (sometimes referred to as K8s) Container management system. Typically suited for large on premise deployments or deployment in Cloud infrastructure.
# Prerequisites
# Kubectl
To manage a Kubernetes cluster you will need a copy of the kubectl utility. Instructions on how to install it can be found here.
# Helm
FlowFuse uses a Helm Chart to manage deployment. Installation can be done through the instructions on their website.
# Kubernetes
You will need a Kubernetes environment. The deployment has currently been tested on the following environments:
- AWS EKS
- Digital Ocean
- MicroK8s
It should run on any Kubernetes platform, but may require some changes for vendor specific Ingress setup.
By default the Helm chart assumes that the Kubernetes cluster has at least 2 nodes:
- One used to run the FlowFuse management infrastructure
- One or more used to run the Node-RED Project instances
You can run a small scale Proof-of-Concept on a single node cluster, details of how to do this can be found in the Configure FlowFuse section below.
# PostgreSQL Database
The Helm chart can either install a dedicated PostgreSQL database into the same K8s cluster or can configure the install to use an external instance.
This is controlled by setting the forge.localPostrgresql value to true/false.
If using the bundled dedicated PostgreSQL database the Bitnami PostgreSQL chart will be used to install an instance of PostgreSQL 14. The Bitnami chart for v14 supports both x86_64 and arm64 installations.
If using an external database you can pass the database details to the helm chart with the following values:
postgresql.hostpostgresql.portpostgresql.auth.usernamepostgresql.auth.passwordpostgresql.auth.database
# DNS
A wildcard DNS entry will be needed to point to the domain that is used for the project instances. This will need to point to the K8s Ingress controller.
For example if you want projects to be access able as [project-name].example.com
you will need to ensure that *.example.com is mapped to the IP address used by your Kubernetes clusters's Ingress controller.
By default the FlowFuse application will be mapped to forge.example.com assuming that you set the domain to example.com.
Notes on how to setup DNS can be found here.
Some features require the ability to send email to users. This can be currently be provided by:
- SMTP server
- AWS SES
# Installing FlowFuse
# Download
helm repo add flowforge https://flowfuse.github.io/helm
helm repo update
# Configure FlowFuse
All the initial configuration is handled by the Helm chart. This is done by creating a customization.yml file in the helm directory that will be passed to the helm along with the chart.
This is the minimal configuration
forge:
  entryPoint: forge.example.com
  domain: example.com
  https: false
  localPostgresql: true
When running on AWS EKS and using AWS SES for email (The IAMRole needs to have the required permissions to use SES) it would look something like:
forge:
  entryPoint: forge.example.com
  domain: example.com
  cloudProvider: aws
  aws:
    IAMRole: arn:aws:iam::<aws-account-id>:role/flowforge_service_account_role
  email:
    ses:
      region: eu-west-1
A more detailed example for running on AWS can be found here
As mentioned earlier the Helm chart defaults to expecting at least 2 nodes in the Kubernetes cluster.
You will need to label at least one node to run the management application and one to run the Node-RED Projects.
You can do this with the kubectl utility. The following command lists all the nodes in the cluster
kubectl get nodesYou can then use kubectl label node to add the required labels:
FlowForge management node(s)
kubectl label node <management node name> role=managementNode-RED projects node(s)
kubectl label node <projects node name> role=projectsTo override this you can remove the node selectors with the following which will mean that all pods can run on any nodes.
forge:
  projectSelector:
  managementSelector:
A full list of all the configurable values can be found in the Helm Chart README.
The install can then be started with the following command:
helm upgrade --atomic --install --timeout 10m flowforge flowforge/flowforge -f customization.yml# Enabling the MQTT broker
To enable the MQTT broker with Kubernetes install you need to add the following to the customization.yml file
forge:
  broker:
    enabled: true
# First Run Setup
The first time you access the platform in your browser, it will take you through creating an administrator for the platform and other configuration options.
For more information, follow this guide.
Once you have finished setting up the admin user there are some Kubernetes specific items to consider.
# Using FlowFuse File Storage
FlowFuse projects running in Kubernetes do not have direct access to a persistent file system to store files or use for storing context data.
FlowFuse includes a File Storage service that can be enabled to provide persistent storage.
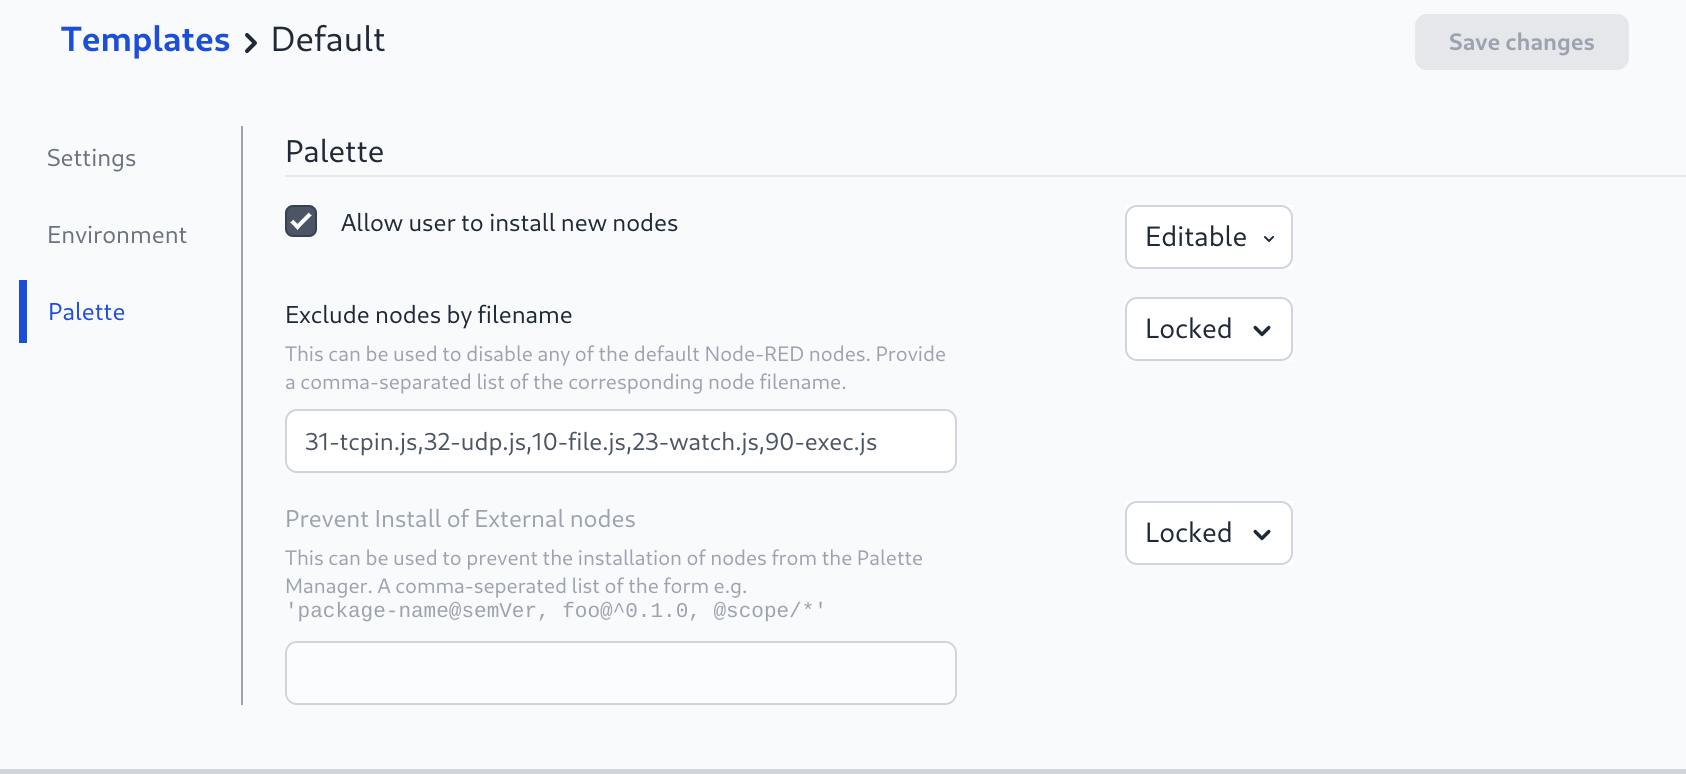
# Disabling the default File nodes
To remove the default Node-RED file nodes from the palette:
- Edit the Project Template to add
10-file.js,23-watch.jsto the "Exclude nodes by filename" section
# Configuring the File Storage service
Full details on configuring the file storage service are available here.
# Enabling the File Storage service
To enable the FlowFuse File Storage component add the following to the customization.yml file:
forge:
  fileStore:
    enabled: true
# Upgrade
All technical aspects of the upgrade process of Flowfuse application running on Kubernetes and managed by Helm chart are maintained in our repository. Please refer to the Flowfuse Helm Chart documentation for more details about the upgrade process.