- docs
- FlowFuse User Manuals
- Using FlowFuse
- Getting Started
- FlowFuse Concepts
- Changing the Stack
- Device Groups
- DevOps Pipelines
- Environment Variables
- FlowFuse File Nodes
- FlowFuse Persistent Context
- FlowFuse Project Nodes
- High Availability mode
- Instance Settings
- Logging
- Shared Team Library
- Snapshots
- Teams
- User Settings
- FlowFuse API
- Migrating a Node-RED project to FlowFuse
- Device Agent
- Device Agent
- FlowFuse Device Agent Introduction
- Quick Start
- Installation
- Quick Start with Web UI
- Register your Device
- Running the Agent
- Deploying your Flows
- Hardware Guides
- FlowFuse Cloud
- FlowFuse Cloud
- FlowFuse Self-Hosted
- Installing FlowFuse
- Overview
- Configuring FlowFuse
- DNS Setup
- Docker install
- Email configuration
- First Run Setup
- FlowFuse File Storage
- Install FlowFuse on Kubernetes
- Local Install
- Upgrading FlowFuse
- Administering FlowFuse
- Administering FlowFuse
- Administrator configuration for SSO
- licensing
- Monitoring
- Telemetry
- User Management
- Support
- Community Support
- Premium Support
- Debugging Node-RED issues
- Contributing
- Contributing to FlowFuse
# Docker Install
This version of the FlowFuse platform is intended for running in the Docker Container management system. Typically suited for small/medium on premise deployments.
# Prerequisites
# Platform
The following instructions assume you are running Docker on a Linux or MacOS host system.
# Digital Ocean
If you are using the Digital Ocean Docker Droplet to host FlowFuse you will need to ensure that port 80 & 443 are opened in the UFW firewall before starting.
sudo ufw apply http
sudo ufw apply https
We have a 1-Click Digital Ocean Droplet that will install and configure FlowFuse for you. Details can be found here
# Docker Compose
FlowFuse uses Docker Compose to install and manage the required components. Instructions on how to install Docker Compose on your system can be found here:
https://docs.docker.com/compose/install/
FlowFuse requires docker-compose v2
# DNS
The orchestration uses an instance of Nginx to route requests to each Node-RED instance. To do this it needs each instance to have a unique hostname, to generate this the instance name is prepended to a supplied domain.
To make this work you will need to configure a DNS server to map a wildcard domain entry to the IP address of the host running Docker. e.g *.example.com.
The FlowFuse Application will be hosted on http://forge.example.com
Note When testing locally you can add entries for each Node-RED instance to your /etc/hosts file but you must use the external IP address of the host machine, not the loopback address (127.0.0.1).
Notes on how to setup DNS can be found here.
# Installing FlowFuse
# Download
Download the latest release tar.gz from the docker-compose project:
https://github.com/FlowFuse/docker-compose/releases/latest
Unpack this and cd into the created directory.
tar zxf v1.x.y.tar.gz
cd docker-compose-1.x.y
# Configuring FlowFuse
Configuration details are stored in the etc/flowforge.yml and the docker-compose.yml files.
Before starting you will need to edit this file to update the the following fields in the etc/flowforge.yml file:
domainbase_urlbroker.public_url
These will need to be updated to replace .example.com with the domain you chose earlier.
Please note that once set, the domain and base_url values should not be changed as these values are used as part of the configuration stored in the database of each Node-RED instance. The ability to migrate domains is on the feature backlog.
You also need to update all the VIRTUAL_HOST entries in the docker-compose.yml file to replace .example.com with the same domain.
For more details on the options available, see the configuration guide.
# HTTPS (optional)
If you want to serve the forge app and Node-RED via SSL you will need to obtain a wildcard TLS certificate for the domain you are using eg *.example.com. If you are running on an Internet facing machine you can use the LetsEncrypt acme-companion.
Otherwise you will need to contact a SSL Certificate vendor and configure Nginx manually.
# Let's Encrypt
In the docker-compose.yml file, uncomment the following lines
- "./certs:/etc/nginx/certs"- "443:443" acme:
image: nginxproxy/acme-companion
volumes:
- "/var/run/docker.sock:/var/run/docker.sock:ro"
- "./acme:/etc/acme.sh"
volumes_from:
- nginx:rw
environment:
- "DEFAULT_EMAIL=mail@example.com"
depends_on:
- "nginx"If you wish to redirect all traffic to use HTTPS then add the following section to the nginx service on docker-compose.yml
environment:
      - "HTTPS_METHOD=redirect"
Then, in the docker-compose.yml file, edit the following lines added your domain and email address
- "DEFAULT_EMAIL=mail@example.com"- "LETSENCRYPT_HOST=mqtt.example.com"- "LETSENCRYPT_HOST=forge.example.com"You will also need to update the etc/flowforge.yml file to change base_url from starting with http:// to https:// and the broker.public_url entry from starting with ws:// to wss://.
# Wildcard TLS Certificate
Create a folder in the docker-compose-1.x.0 directory named certs, place your .crt and .key files in there, they should be named for the domain without the * eg example.com.crt & example.com.key
You also need to create a copy of the .crt and .key files named default.crt & default.key in the same folder. This is used for serving unknown hosts.
In the docker-compose.yml file,
- uncomment the line
- "443:443"- Add this line to the
volumessection of the nginx proxy
- "./certs:/etc/nginx/certs"If you wish to redirect all traffic to use HTTPS then add the following section to the nginx service on docker-compose.yml
environment:
      - "HTTPS_METHOD=redirect"
You will also need to update the etc/flowforge.yml file to change the broker.public_url entry from starting with ws:// to wss://.
# Running FlowFuse
We need to manually download the flowfuse/node-red container that will be used for the default stack.
This is done with this command:
docker pull flowfuse/node-redOnce that completes we can start FlowFuse:
Using the docker compose plugin
docker compose -p flowforge up -dOr using the docker-compose command
docker-compose -p flowforge up -dThis will also create a directory called db to hold the database files used to store Node-RED instance and user information.
# First Run Setup
The first time you access the platform in your browser, it will take you through creating an administrator for the platform and other configuration options.
For more information, follow this guide.
Once you have finished setting up the admin user there are some Docker specific items to consider.
# Using FlowFuse File Storage
Node-RED instances running in Docker do not have direct access to a persistent file system to store files or use for storing context data.
FlowFuse includes a File Storage service that can be enabled to provide persistent storage.
# Disabling the default File nodes
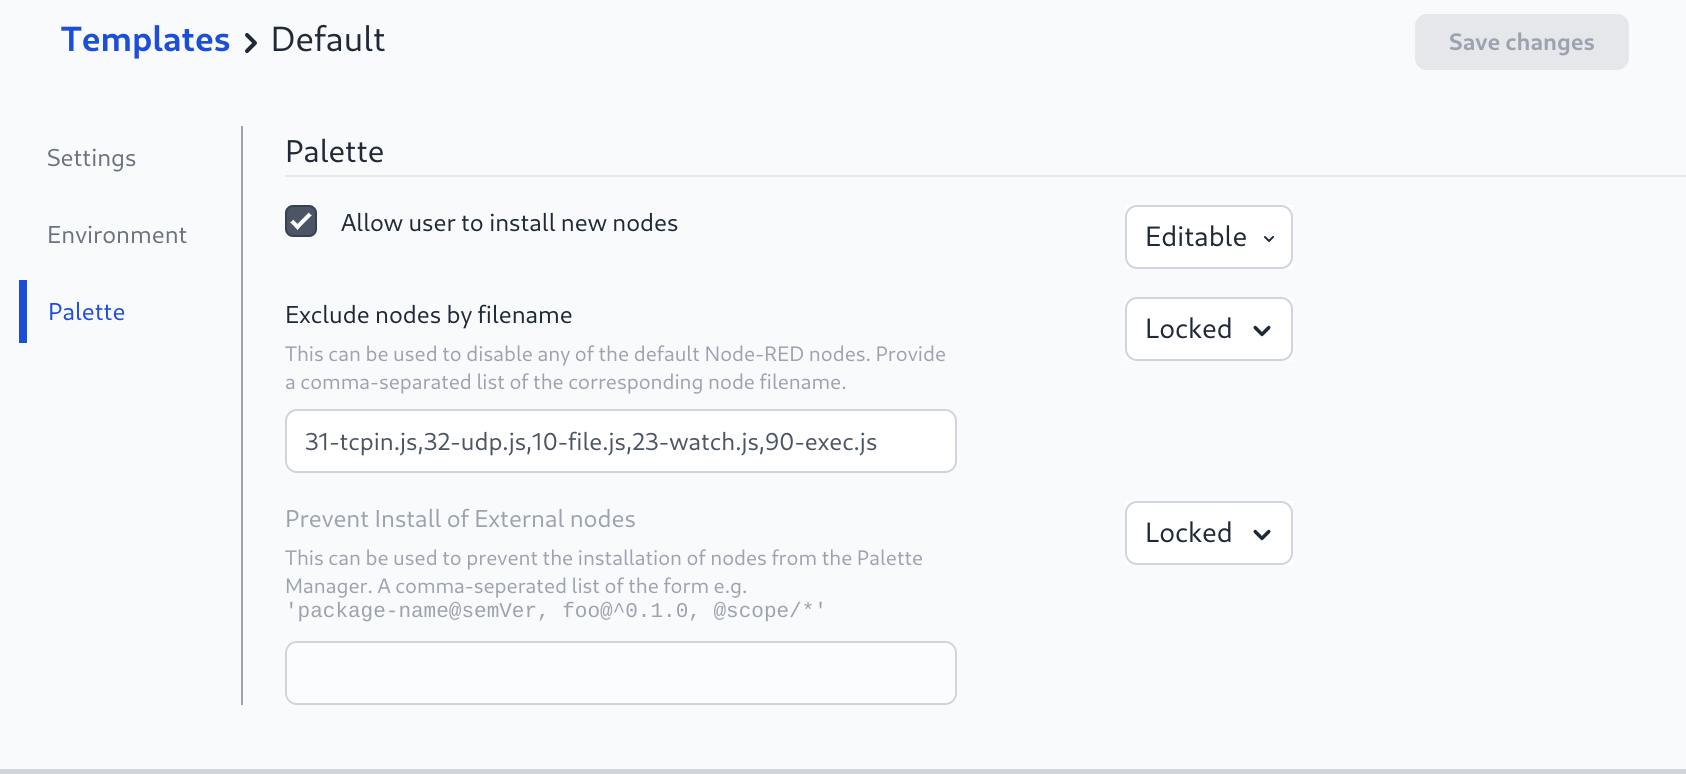
To remove the default Node-RED file nodes from the palette:
- Edit the Template to add
10-file.js,23-watch.jsto the "Exclude nodes by filename" section
# Configuring the File Storage service
Full details on configuring the file storage service are available here.
# Enabling the File Storage service
To enable the FlowFuse File Storage component add the following to the etc/flowforge.yml file:
fileStore:
  enabled: true
# Upgrade
- Stop the existing instance with
docker-compose -p flowforge down - Download the latest Source code tar.gz here
- Uncompress the tar file:
tar -xzvf v2.y.y.tar.gz. A new directory should appeardocker-compose-2.y.y - Pull the latest version of the containers from Docker hub
docker pull flowfuse/forge-dockerdocker pull flowfuse/node-reddocker pull flowfuse/file-server
- Copy the
db(and thecerts&acmeif using HTTPS certs) directory from the old version directory to the new (this will probably require root due to file ownership)sudo cp -r docker-compose-x.x.x/db docker-compose-y.y.y/db - Compare the old
docker-compose.ymlto the version supplied with the new version, copy over any changes made, e.g. enabling HTTPS/TLS Certificates and setting theVIRUAL_HOSTenvironment variables Ensure the new container names are used starting withflowfuse/notflowforge/ - Compare the old
flowforge.ymlto the new version, and copy over variables specific to your set-up: url, broker, etc. - Start the new version in the new directory
docker-compose -p flowforge up -d